
Tomato Plants
Tomato plants are practically synonymous with vegetable gardening; you’d be hard pressed to find a vegetable garden without them! Here are a few things to keep in mind, especially with regard to young tomato plants:
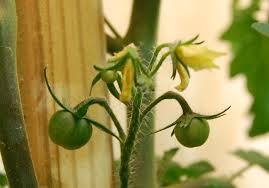
Removing the sappers: As your tomato plant starts to grow bigger, you will notice that there is a main stalk, with composite leaves coming off the main stalk at various intervals. Now, take a closer look: You will see that at the juncture of every leaf coming off the main stem, little shoots are sprouting. Left alone, these secondary shoots will also grow into large stalks – with even more secondary stalks branching off here and there – and this will result in a “bushy” plant.
In order to keep your tomato plants slim and strong and tall (and thus save on horizontal space), many gardeners remove these sapper shoots from the young tomato plant, at least until the plant is about two feet tall. This way, the plant will get a firm foothold, with only one main stalk to start out with, and its growing potential will not be diverted to the “side-shows.” If you do this, be careful not to pull off the main growing shoot at the top of the plant; this is the one you want to grow! (If by some chance the main growing shoot is cut off – either by you or by some critter – not to worry; one of the sappers will eventually reappear and take over as the main shoot.)
In a similar vein, many tomato plants these days are biologically engineered to produce flowers and fruits at a very young age, when the plant is still very small. I recommend taking a scissors and carefully cutting off these early flowers and fruits, until the plant is a couple of feet tall. The reason for this is the same as above: Let your plant grow a strong root and leaf structure before it goes into secondary stalk and fruit production. Your plants will be healthier in the long run, and produce more tomatoes as well.
Staking tomato plants: Tomato plants do not have firm stalks, and as the plant grows taller and longer, it will flop over and eventually end up on the ground. Tomatoes lying on the ground tend to rot faster, and they also will attract more insects and other unwanted four-legged consumers, who may be tempted to come sample your wares. For these reasons, most gardeners stake their tomato plants.
The simplest tomato stake is a stick driven into the ground next to the young tomato plant. I say “young” tomato plant, because you will want to stake it before it flops onto the ground, and before an advanced root structure can be damaged by driving a stake through the heart of it!
Flimsy or thin tomato stakes sold at many stores – including thin rods of plastic-coated metal – will not be of much use if you’ve got tomato plants that are going to grow large and tall: A six-foot tomato plant loaded with 5-12-ounce tomatoes will just cause a weak stake to bend over or snap, defeating the whole purpose of why you put it there in the first place! I get my tomato stakes from Edrich Lumber Co (410-922-5959), 9700 Old Court Road, located three miles west of Liberty Road. They sell bundles of 1”x2”x7” tomato stakes that are generally strong enough to handle even the most robust tomato plants.
If you do use tomato stakes to support your tomato vines, you will need some material to tie the vines to the stakes. Recommended: old T-shirts or nylon stockings cut into strips and stored in a box. (Do the cutting up inside, where it’s cool, not outside in the heat of the day.) Because these materials are stretchy, they will not cut into the tomato vine stalks, and will also “breathe” with them as they grow. Not recommended: string, plastic, or rope, since these “hard” materials may cut into your vines, bruising them and inviting disease and/or insect invasion.
An alternative to tomato stakes are tomato “cages,” which fit around your young tomato plant and support the many vines and fruits that spread outward from the plant. Many gardeners like to use these cages because they’re sturdy and don’t involve actually tying up the vines; merely placing the growing vines onto the metal rungs seems to do the trick. However, tomato cages are relatively expensive, and may not accommodate a very large tomato plant. Each to his/her own, just so long as the vines and fruits are kept off the ground.
Cukes, Melons, and Squash: Training the Vines
If you’ve planted any of these in your garden, you will notice that, as the weather turns warmer and their growth “engines” get revved up, these meandering vines will take off in every direction, perhaps even “invading” parts of your garden where they’re not invited, crowding out more stationary plants that have nowhere else to go! What to do?
If you’ve planned ahead, then you’ve planted these vegetables either next to a fence or trellis, or next to an open area: places where these vines can either grow up or grow out. The trick here is to show these vines where to go – to train them to grow into (or onto) the places and spaces that you’ve set aside for them.
If you want the vine to grow up, gently take the growing vine head and push it through an opening in the fence; or take the vine and gently wind it around your string supports; or take a T-shirt strip and tie the vine to the vertical support. In some cases, the vines may have already sprouted those amazing tendril “fingers” that will reach out and grasp the vertical support on their own. If you want, take a curled up tendril and gently wrap it around any place you want the vine to grow. You are the garden boss: Show the vines where you want them to grow, and don’t take no for an answer.
If you want the vine to grow out, simply take the developing vines and always train them to go in the direction you want them to go. Spread out the vines as they grow along the ground. If stubborn vines keep heading off into other inhabited areas of the garden, then cut off that branch of the plant (tough love!). Don’t worry; it won’t hurt the rest of the plant, and will only make the remaining vines stronger! Cukes, melons, and winter squash that rest on the ground are okay; the fruits are not as soft and delicate as tomatoes, and they will not get damaged so quickly.
Getting a Handle on Weeds
What’s a weed? By definition, it is any unplanned growth that shows up in your garden that you don’t want to be there! It doesn’t matter if it’s the most beautiful flower or a “volunteer” tomato seedling from last year’s crop or a dastardly dandelion – if you didn’t plan on it being there, and if it’s going to compete with planned growth for this year’s crop, then it’s a weed.
Weeds are kind of like chametz; they grow and proliferate everywhere, and sometimes they seem to come up within “18 minutes” after tilling your garden bed. Check the tilled soil in your garden a week or two after tilling, and you will see hundreds of weeds sprouting up everywhere in sight! Gak! If left unchecked, these cute little weeds will grow into very big, monstrous weeds – weeds that can take over your garden when you’re not looking, stealing nutrients, space, and sunlight from your precious plants.
Here’s a couple of ways to keep weeds under control:
Cultivate Between the Rows: This is a somewhat sophisticated term for a relatively mundane activity: It means to turn over the soil between and around your plants. This can be done in a number of ways: You can get down on your hands and knees and use a hand trowel to carefully turn over the soil between and around your plants. Chop up the soil while you’re at it. And try to turn over all the baby weeds and bury them, bottoms up.
If you’ve got a larger garden space and/or stooping down is not your cup of tea, there are tools called “cultivators” (google it) that basically have a pronged tool attached to a long stick that you can drag through the soil between and around your plants. This tool will break up the soil and disturb the roots of the unwanted weeds. I have a two-pronged cultivator that is fairly narrow and does a great job of breaking up the soil and weeds, even when the vegetable plants have been planted in relatively narrow rows. Other cultivators may have a claw-type tool at the working end (with four or five “fingers”); this claw will do the same thing, but with a wider swath. If you’ve got a lot of space between the rows, you can even use your garden fork or a shovel to turn over the soil.
Warning: Unfortunately, it’s not too hard to dig up a vegetable plant by mistake when cultivating between the rows! So, take care that you don’t dig too close to the designated garden plants when performing this exercise.
Disclaimer: Even in relatively large gardens, if you have the proper tool, cultivating between the rows doesn’t take that much time. However, this remedy is only good for a couple of weeks; after that, the weeds come back, and you’ve got to do it again – kind of like vacuuming.
Mulching: When you mulch, you are simply putting down something over the soil between and around the plants in order to prevent the weeds from growing. We’ve already discussed putting down black-plastic mulch in the last article, but that must be done before planting any seedlings. If you didn’t do it back then, you can’t do it now.
However, there is still a good mulch you can use throughout the summer to prevent the weeds from growing; it’s readily available, looks nice, and is biodegradable. Next time you mow the lawn, don’t throw away those grass clippings; rather put them on the soil between and around your vegetable plants. In order to prevent the weeds from growing through, you’ve got to put down a relatively thick layer, about 4 inches. However, leave a buffer space between the mulch and the stems of your plants, just in case the clippings get hot as they begin to decompose. Grass clipping mulch will prevent up to 90 percent of the weeds from growing. For the weeds that make it through the mulch shield, just pull them out.
Since I have a relatively large garden plot, the clippings from my lawn don’t suffice to cover it all. So, I cruise the neighborhood on the next sunny day after a rainy spell, looking for nice smooth plastic bags of grass clippings that my good neighbors have put aside for me. As I load the bags into the back of my van, I reflect on the truth of the saying that one man’s trash is another man’s treasure!
At the end of the growing season, when your vegetable plants are gone, you can work the now dried-out clippings back into the soil, where they will make compost on location. What could be better than that?
Bottom line: When you see a weed, pull it out, preferably before it gets too big. Proverbially speaking, the only good weed is a dead weed.
Thinning Out the Crops
If you’ve planted root crops (radish, beets, turnip, parsnip, carrots, etc.) by sprinkling seeds into a furrow directly into the garden bed (see article #4), these seedlings will need thinning. This means getting down onto your kneeling garden bench and judiciously pulling out the extra seedlings until you are left with the proper space between those remaining (see the directions on the seed packet). This is critical: Many root crops that “bump into” each other will stop growing and not produce fruit, so make sure that each plant has its own territory.
Thinning is also a required exercise for beans and peas that you’ve planted directly into the garden bed (see the last article). Since you’ve planted twice as many seeds as needed, you need to thin out the row by pulling out the extra seedlings (assuming they’ve all come up). Remember our maxim: less is more. Too many plants that are too close together is poor policy out in the garden bed.
Watering
When your plants are young and small, use a gentle spray of water from a hose nozzle to water them. (You can get multi-spray nozzles at all the garden centers; even at Seven Mile Market.) If your plants are a bit larger and tougher, a gentle jet of water aimed at the juncture of stem and soil for a minute or so will give each plant the water it needs. (The mulch surrounding your plant will cushion the water stream, leaving the soil undisturbed). When it rains, you don’t need to water; when it’s dry, you do.
As your plants grow bigger, you don’t want to give them a superficial spritz anymore. The best watering you can give your plants is a deep watering, where the water really seeps down into the soil. If the water goes deep, the roots will also go deep, and your plants will remain strong and resilient, even when it’s dry. If the water stays shallow, the roots will be shallow, and the plants will be weak and need watering constantly.
So, here’s the deal: Better to water every other day or every third day with a deep watering, than to water every day with a shallow watering. The best way to water deep (especially if you have a large garden) is with a sprinkler; let the sprinkler run for a few hours, so the water will run deep.
Don’t water at night. Rather, water during the day, so that the excess water can evaporate from the leaves. Damp leaves at night can lead to disease.
Oh, Deer (and Other Uninvited Guests)
We could write an entire article about the scourge of deer in the garden. When you are a gardener, and you’ve worked long and hard to develop your plants, and there’s no more time to start over should anything happen to your crops, and your plants are just about to bear fruit – it really is quite shocking to come out one morning and see the devastation that deer can bring: total destruction of the chosen crop, gone without hope of redemption. To gardeners, there is nothing very cute about deer (except when you are traveling in the mountains…).
How to control deer? Build a fence – although I’ve heard that deer can easily jump and clear an eight foot fence (assuming there’s enough clearance)! There are all kinds of plastic and mesh fences designed to keep deer out, and they are inexpensive. Once you’ve been ripped off by deer, you will seriously consider these preventive enclosures.
Also on the market are sprays and repellants (aimed at rabbits and other critters, as well) that are purported to keep deer away. I don’t think any of them are foolproof, but it is certainly worthwhile to try them out and use them for as long as they do work.
If you start to see holes in the leaves of your leafy and cold-weather vegetable, the damage is most likely caused by slugs and/or cabbage worms – the eggs of the latter being laid constantly by those cute little white butterflies (really, moths) that just love to fly around your garden plants. Small holes riddling the surface of your eggplants are caused by little black beetles that have an affinity davka for eggplants.
There are antidotes and insecticides available at the garden center that can be used to control these pests (i.e. Ortho Sevin). Or you can look for natural/organic methods to combat these pests. If you just ignore them, they won’t go away – so plan to take steps to protect your plants and your gardening investment.
In Touch With Your Garden
Visit your garden every day and take stock of how things are going. Get nachas when your babies are doing well and growing strong; take note when they are not growing well and appear weak. Take care of business and pursue the necessary steps to keep your enterprise flourishing. Most of all, enjoy that special feeling of joy when you bring in your first garden crops (and flowers) and serve them at your weekday and Shabbos table. Hazorim bedima, berina yiktzoru.â—†
Have you missed earlier articles in this series? Write to Avraham Cohen at avcograph@aol.com and I will send them to you.